Operation

Operation of the Retro Scaler A1

Basics

You need power, a display and a source.  It doesn’t matter in which order you connect these.

Power

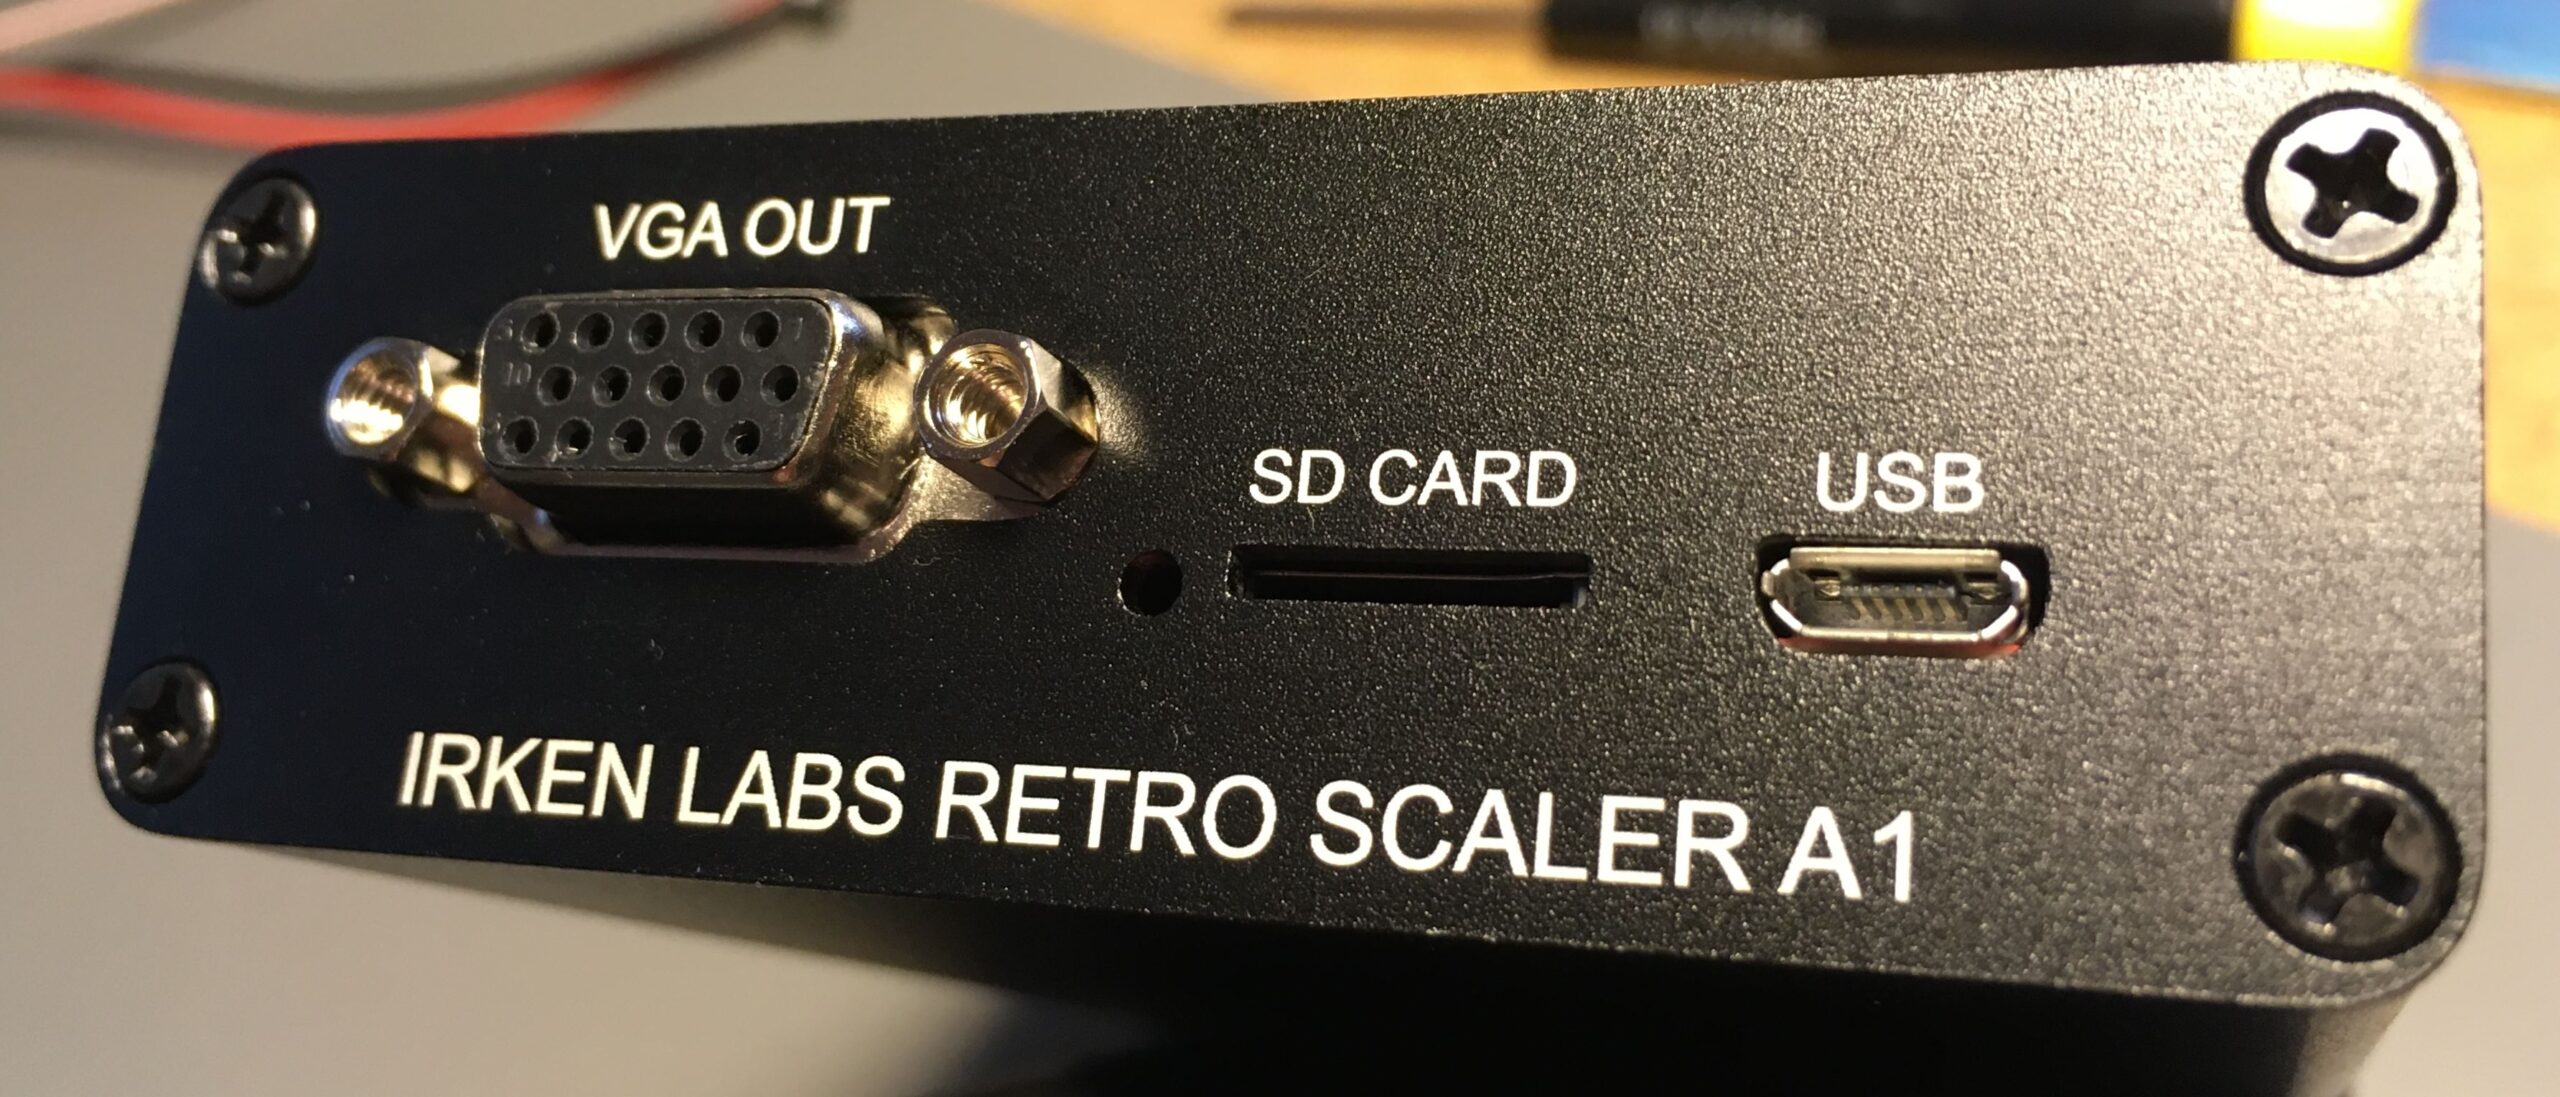
You power the unit via the USB port using a micro-usb cable, which is a very common type.  You can power it from a computer, a phone charger or the Jammafier. When powered, a red LED next to the VGA OUT port will light up.

Connect to a display

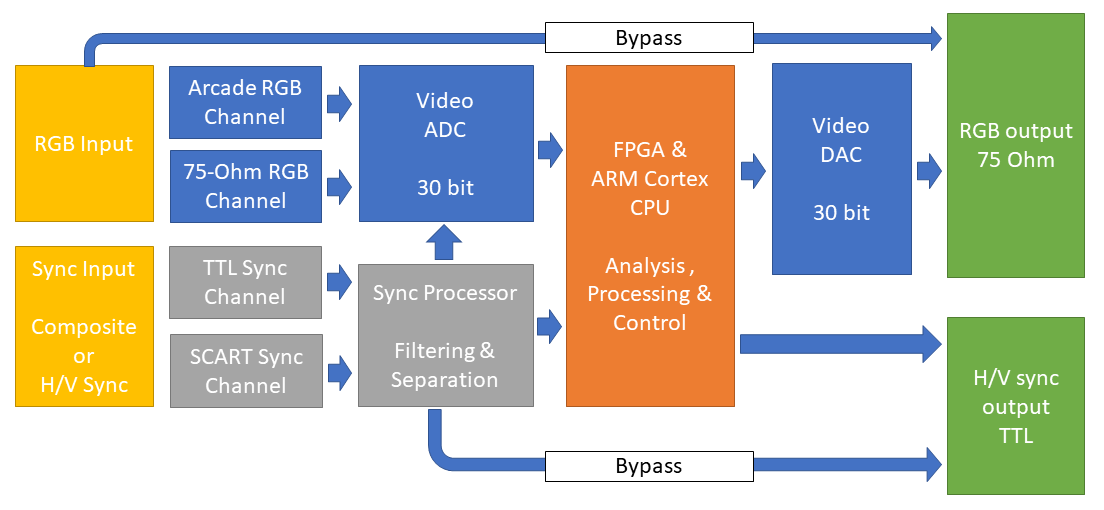
Connect your display to the ‘VGA OUT’ port.  Both RGB and sync output is standard VGA, and you can use an LCD monitor – though a CRT by nature will look a lot better :).

Be aware that the scaler does not change vertical frequency, i.e. if the source if 54Hz, the output will also be 54Hz.  For CRT monitors this is usually not an issue, but LCD’s may be more picky.

Arcade game as source

If you want to upscale an Arcade game and have a Jammafier, just use a normal VGA cable and you’re done.  If you have a tri-sync helper, disconnect it before using the scaler. The Retro Scaler uses and defaults to raw arcade video, i.e. there should be a direct connection between the Jamma edge and the RGB input on the scaler.

Retro computer/console as source

You will most likely need a custom cable, and you will need to configure the input to be 75-ohm.  

Buttons

Button A, brightness/white

The scaler adjusts to the incoming signal once synced up, and then again after 8 seconds (by default), and will also do an adjust if the signal overloads at any time.  You can press the ‘A’ button to trigger a re-adjustment.

Button C, scanlines

The scaler has 5 scanline setings, from none to heavy.  The default is none.  You can cycle through these by pressing the ‘C’ button.  If you start the scaler with an SD card, it will remember your setting.


LEDs

There are 3 leds, next to the buttons.  They are red, green and blue.  When all 3 are illuminated and stable, there should be an output to the display.

Red led

The scaler is waiting for any sync activity

Green led

The scaler is trying to lock stable sync from the sync processor.

Blue led

The scaler is trying to lock stable sync from the video digitizer.


Tested Sources

Systems with issues 

Atomiswave – analog bypass

It has been reported that analog bypass of Atomiswave when in 31k mode does not work properly.

Toaplan 2

Some Toaplan 2 not lock properly, and display a distorted image on CRT monitors and likely no image on an LCD monitor.  The root cause of this is that the irregular sync period is not a multiple of normal lines.  It is normal for sync lengths around vsync to be irregular, but the sum of them are a multiple of normal lines.  Because of this irregularity with Batsugun, first visible lines of the image are not ‘where they are supposed to be’, and the scaler has trouble displaying this correctly.  It is not confirmed, but it is suspected that this is the same issue the OSSC has.  Gamed tested not working with the Retro Scaler A1 are:

  • Batsugun
  • Dogyuun
  • V-V/Grind Stormer

OSSC Reference: https://shmups.system11.org/viewtopic.php?f=6&t=65035

Taito Fighting Hawk

Does not work correctly with the A1, for (so far) unknown reasons.

Consoles

SystemMods/CableIssuesTester & Date
Sony PS1 (phat) the monitor goes on/off all the time, SyncMaster 210T2020-01-02 Vendest

StarTech Component to VGA Video Converter

Part number CPNT2VGAA.  This unit is believed to output positive v-sync, which is not compatible with the A1.  The A1 will only work with negative sync.


Systems with degradation

Consoles

SystemMods/CableIssuesTester & Date
Nintendo Famicom HVC101NESRGB modSlight bowing/shimmer upper right corner2019-12-21 InvZim& geekmiki
Sony Playstation 2, US (Fat, 39001)via Extron Crosspoint 300240p input (e.g. Playstation 1 games): perfect and crystal clear, 480i: horrid result.2020-03-23 Mattia

Systems without issues

31K systems, analog bypass

Taito Type X – analog bypass

Sega Naomi – analog bypass

Tatsunoko vs Capcom – analog bypass, tested by wigsplitta

Non-arcade

ManufacturerSystem / versionMods/CableNotesTester & Date
Apple IIGSManilla Gear VGA adapterCSYNC out2019-12-28 sammargh
CommodoreAmiga 1200  2021-10-09 sammargh
Microsoft Xboxvia gscartsw 2020-01-04 BroadwayJose
NEC PcEngine CoreGraphicsSD system 3 from TerraOnionSource is a little noisy by nature2019-12-21 geekmiki
Nintendo AV FamicomNESRGB, csync and OEM cables 2019-12-28 sammargh
Nintendo N64 A few vertical lines, could be LCD related2020-01-02 Vendest
NintendoSuper Famicom NTSC Jap RGB-02via Extron Crosspoint 300 2020-03-23 Mattia 
NintendoSuper Famicom NTSC Jap 1-Chipvia Extron Crosspoint 300 2020-03-23 Mattia  
Sega DreamcastPAL hardware, stock RGB scartall modes and tests in 240p suite2019-12-21 InvZim
Sega Game GearMcWill VGA mod – CSYNC out 2020-01-02 sammargh
Sega Mega Drive V1RGB scart from retrogamingcables.co.uk 2019-12-21 InvZim& geekmiki
Sega Saturn “It’s perfect w/o any noise”2020-01-02 Vendest
SegaSaturn NTSC US Model 2via Extron Crosspoint 300 2020-03-23 Mattia  
SharpX68000  2021-10-09 sammargh
SNKNeo-Geo AES NTSC Japvia Extron Crosspoint 300 2020-03-23 Mattia  
SNKSNK Neo-Geo CDZvia Extron Crosspoint 300 2020-03-23 Mattia  
SonyHB-F1XV MSX2+via Sync Slayer II 2021-10-09 sammargh

Arcade Games

Caveat for Vewlix owners – the LCD in one or more models of the Vewlix, particularly the Diamond variety, may not process the scaled output of the A1 properly or at all for some of the titles below. The majority of titles work without issues.

ManufacturerGameNotesTester & Date
AtariDig Dug 2019-12-19 InvZim
AtariPit Fighter 2020-01-09 wigsplitta
AtlusPower Instinct 2020-05-05 radiantsvgun
BanprestoPretty Soldier Sailor Moon 2019-12-21 rtw
BanprestoSuper Spacefortress Macross 2019-12-19 InvZim
BootlegBubble Bobble 2019-12-19 InvZim
BootlegGhost’n Goblins 2019-12-19 InvZim
BrezzasoftCrystal SystemThe Crystal Of Kings2020-01-14 rtw
BrezzasoftCrystal SystemAll titles2020-03-26 Derick2k
CapcomCommando Hardware1943 – syncs OK, has pixel noise, could be LCD2019-12-21 rtw
CapcomCommando HardwareBlack Tiger2019-01-07 8bitforlife
CapcomCommando HardwareCommando2019-12-19 InvZim
CapcomCPS-1Three Wonders2019-12-21 rtw
CapcomCPS-1.5The Punisher2019-12-24 Wigsplitta
CapcomCPS-2Progear2019-12-19 InvZim
CapcomCPS2 ‘All-in-One’ BlackHSF2: AE2020-01-03 wigsplitta
CapcomCPS-3SF3 Third Strike2020-01-03 wigsplitta
CapcomSide Arms 2019-12-19 InvZim
CapcomStreet Fighter The Movie 2020-03-17 Derick2k
Cave68000 HardwareDangun Feveron2019-12-21 rtw
Cave68000 HardwareDonpachi2020-01-09 wigsplitta
CaveCV-1000Espgaluda II, ok on CRT and LCD2019-12-21 InvZim
CaveCV-1000

Pink Sweets – very slight bowing in top right corner when screen is bright on LCD, not present on CRT.  GIF showing issue on LCD.

2019-12-21 rtw
CaveKetsui 2019-12-20 rtw
Data EastDeco32Night Slashers2019-12-21 rtw
Data EastMagical Drop 2020-05-05 radiantsvgun
Data EastNitro Ball 2019-20-21 rtw
GaelcoWorld Rally ChampionshipAtari License2020-01-06 wigsplitta
IGSPolyGame Master (PGM)The Gladiator2020-04-28 radiantsvgun
IGSPolyGame Master (PGM)Knights Of Valor2020-01-14 rtw
IGSPolyGame Master 2 (PGM2)DoDonPachi Dai Ou Jou Tamashii2020-05-05 radiantsvgun
IGSPolyGame Master 2 (PGM2)Knights of Valour 3 / Sangoku Senki 32020-05-05 radiantsvgun
IGSPolyGame Master 2 (PGM2)Oriental Legend 22020-05-05 radiantsvgun
IremKung-Fu Mastergame by itself has a little noisy video2019-12-19 InvZim
IremM72Dragon Breed2019-12-20 rtw
IremM72R-Type2019-12-20 rtw
IremM72X-multiply2020-01-07 Joe
IremM77Kickle Cubicle2020-01-09 rtw
IremM84R-Type 22019-12-19 InvZim
IremM92In The Hunt2020-05-05 radiantsvgun
IremMoon Patrolgame by itself has a little noisy video2019-12-19 InvZim
JalecoMega System 32P-47 Aces 2020-02-15 rtw
KanekoB.Rap Boys 2020-04-28 radiantsvgun
KanekoDJ Boy 2020-05-05 radiantsvgun 
KanekoGals Panic 2019-12-21 rtw
KanekoSuper Nova SystemCyvern2019-12-21 rtw
KonamiGradius II 2019-12-19 InvZim
KonamiGX systemWinning Spike2019-12-19 InvZim
KonamiNemesis (Gradius) 2019-12-19 InvZim
KonamiLife Force / Salamander 2019-12-19 InvZim
KonamiMartial Champion 2020-04-28 radiantsvgun
KonamiMetamorphic Force 2020-04-28 radiantsvgun
KonamiMystic Warriors 2020-04-28 radiantsvgun
KonamiTMNT based HWAliens2020-01-06 Joe
KonamiTMNT based HWTMNT2020-01-06 wigsplitta
KonamiTMNT based HWSunset Riders2020-01-06 wigsplitta
KonamiX-Men based HWCrime Fighters 22020-01-06 wigsplitta
KonamiXexex 2020-01-07 rtw
MetroLast Fortress 2019-12-21 rtw
MidwayMidway Y UnitMortal Kombat2020-01-03 wigsplitta
MidwayMidway T UnitMortal Kombat 22019-12-19 InvZim
MidwayMidway Wolf UnitUltimate Mortal Kombat 32019-12-19 InvZim
NamcoNA-1Fighter & Attacker2020-01-07 8bitforlife
NamcoNA-1Emeralda2019-12-21 rtw
Namco System 1Dragon Spirit2020-01-07 rtw
NamcoSystem 2Valkyrie2019-12-21 rtw
NamcoSystem 2Phelios, Dragon Saber, Burning Force2020-04-28 radiantsvgun
NamcoSystem 10Mr. Driller G2019-12-19 InvZim
NamcoSystem 11Tekken 22020-01-07 8bitforlife
Namco System 11Dancing Eyes2020-05-05 radiantsvgun
Namcosystem 12Tekken 3 – interlace and non-interlace video2019-12-19 InvZim
NamcoValkyrie 2019-12-21 rtw
NMKGunNail 2019-12-21 rtw
NichibutsuTerra Force 2019-12-21 rtw
NintendoNintendo Super SystemSuper Mario World2019-01-09 wigsplitta
PsikyoStrikers 1999 (Strikers 1945 III) 2019-12-19 InvZim
SegaC-2 Puyo Puyo2019-12-20 rtw
SegaC-2Thunder Force AC2020-01-06 wigsplitta
SegaST-VWinter Heat, interlace and non-interlace video).2019-12-19 InvZim
SegaSystem 2Choplifter2020-04-28 radiantsvgun
SegaSystem 16Shinobi2019-12-21 rtw
SegaSystem 18Michael Jackson’s Moonwalker2020-01-07 Joe
SetaAleck64Tower & Shaft2021-01-25 rtw
Seta, Sammy, ViscoSSV systemVasara2019-12-21 rtw
SeibuRaiden DX 2019-12-21 rtw
SeibuSPIRaiden Fighters2019-12-20 rtw
SNKMV-1A (NeoGeo MVS)Puzzle Bobble2019-12-19 InvZim
SNKHyper NeoGeo 64Buriki One2020-04-04 Rave Pants
SNKHyper NeoGeo 64Fatal Fury: Wild Ambition2020-04-04 Rave Pants
SNKHyper NeoGeo 64Samurai Spirits 22020-04-04 Rave Pants
SNK PlaymoreNEO-MVH MVOSVC Chaos: SNK vs Capcom2020-01-16 wigsplitta
TaitoArkanoid – Revenge of DOH 2019-12-19 InvZim
TaitoTaito F2 system
Metal Black
2019-12-21 rtw
TaitoTaito F2 system
Pu.Li.Ru.La
2020-03-26 Derick2k
TaitoTaito F2 system
The Final Blow
2020-05-05 radiantsvgun
TaitoTaito F3 system
Bubble Memories, Darksoft F3 multi
2019-12-20 rtw
TaitoTaito G-net systemSuper Puzzle Bobble2019-12-19 InvZim
TaitoTruxton / Tatsujin 2019-12-19 InvZim
TaitoVolfiedmissing some lines on LCD, ok on CRT2019-12-21 rtw
TaitoWardner 2020-02-28 Thchardcore
TechnosDouble Dragon II 2020-04-29 radiantsvgun
TechnosRenegade 2020-04-28 radiantsvgun
TechnosWrestlefest 2020-01-06 wigsplitta
TechnosoftHyper Duel 2020-02-28 Thchardcore
TecmoNinja Gaiden 2020-01-07 8bitforlife
ToaplanSnow Bros. 2020-01-03 wigsplitta
ToaplanTiger Heli 2020-04-28 radiantsvgun
ToaplanVersion 1 HWOutzone2019-12-21 rtw
ToaplanVersion 2 HWArmed Police Batrider2020-04-28 radiantsvgun
ToaplanVersion 2 HWTruxton II / Tatsujin Oh2020-04-28 radiantsvgun
TehkanBomb Jack 2019-12-19 InvZim

Detailed Mode of Operation

Detailed mode of operation

Inputs

All input is via a single HD15-F connector, labeled “RGB INPUT”.  It defaults to the “Arcade RGB” channel and the “TTL Sync” channel.   This is the setting to use for Jamma games.

The 75-Ohm and Scart sync channel can be selected by editing the .ini file that will be created when you start the scaler with a micro-sd card inserted.  Be aware that if your ‘scart system’ is modded, it may already output a sync signal that is compatible with the TTL channel, so try that first.

The TTL sync channel has an additional anti-jitter stage that is not present on the Scart sync channel.

Sync is forwarded to the sync processor which cleans the incoming sync, and separates it into H/V if the input signal is C-sync. 

For RGB, the signal is terminated with either 75-ohm or 900-ohm depending on which channel is active, the Arcade channel also attenuates the signal.

From input to output

The system goes through different stages before it can output an image, the different stages are described below.

Stage 1

The system will be in stage 1 when no sync activity is detected.  In stage 1, most of the circuitry is either off or in stand-by and the system consumes very little power.  Once sync activity is detected, the FPGA is activated. 

The scaler will illuminate the red LED while in stage 1.

Stage 1.5

If the sync is higher than about 24 kHz,  the bypass function will be activated – this can be overridden in the .ini file.  If sync is lost or goes below threshold, it will go back to stage 1.

Stage 2

The FPGA analyzes the signals from the sync processor, and once stable, move on to stage 3.  If it fails to make sense of the incoming sync, it goes back to stage 1.

The scaler will blink the green LED while in stage 2.

Stage 3

ADC is powered up, and the FPGA analyses both sync and RGB from ADC.  Individual analog gain for R,G & B will be adjusted to achieve maximum use of the ADC’s headroom while also ensuring proper white balance (RGB gain match). 

If the output from the ADC is unstable, it will fall back to stage 2.

The scaler will blink the blue LED while in stage 3.  

Stage 4

Analog pre-ADC gain is re-adjustet after 8 seconds, this interval can be changed in the .ini file.  Video is line doubled, and the output section of the scaler is powered up.  

To protect the ADC, gain will be re-adjusted in case there is clipping – i.e overload on the ADC input.

If sync is lost, it will revert back to stage 2.

If sync goes above scaling range, e.g. to 31kHz, it will quickly jump to stage 1.

The scaler will have red, green and blue LEDs illuminated while in stage 4.


Firmware Update

Firmware Update

The firmware can be updated using a standard Micro SD card.  The card must be formatted with a FAT file system.  It is not possible to ‘brick’ the Scaler – if you have a problem during an update, simply try again.

Update Procedure

  1. Download zip file below and extract to an SD card.
  2. Insert SD card 
  3. Press and hold buttons B and C 
  4. Connect USB power
  5. Release buttons
  6. LED’s will now scroll towards buttons
  7. Push button C to start firmware process
  8. LEDs will scrolling towards VGA connector when the update is complete
  9. Push button C to launch firmware, or simply disconnect and re-connect USB power

Firmware

2020-06-26  Firmware

2019-12-28  Firmware

Details on firmware update

The update process has 3 stages, the LEDs will show which stage is active.  

Stage 1 – Red

Stage 1 checks the hardware, if the SD card is readable and if the checksum of the update file is correct.

Stage 2 – Green

Stage 2 clears the existing firmware on the Scaler.

Stage 3 – Blue

Stage 3 writes new firmware.  This stage takes the most time, the blue LED will blink to show progress.

Update Errors

If an error occurs during the update, an SOS pattern will show.  The SOS pattern is 3 short blinks, 3 long blinks and 3 short blinks. The color of the short blink indicates which stage the error occurred, the long blink the specific problem.

Short red, long red

The SD card is not readable, or no SD card inserted.  

Solution: try another SD card.

Short red, long green

The file system on the SD card is not recognized. 

Solution: reformat SD card with FAT, FAT32 or exFAT.

Short red, long blue

Firmware file corrupt.  Try to copy it again, or try a different SD card.

Solution: Download file again.

Short blue, long red

Problem reading firmware file during update.

Solution: the SD card likely has intermittent problems, try again or use another card.


Analog bypass

Analog bypass

Analog bypass is a feature where the incoming video routed directly to output, sync is still cleaned and separated into H/V if the source is C-SYNC.

You can change this by editing the [base] section of the ini file:

[base]
bypass=auto

The individual settings are described below.

auto

This is the default setting, and routes the input signal directly to output when input frequency is higher than about 25kHz. 

The intended use is if you want to keep the scaler permanently attached to a monitor, but don’t want it do anything for video sources your monitor can handle natively.

off

Bypass feature is disabled

on

This is a special case that turns the scaler into a very expensive sync cleaner.

Connect a source

Connect a source

By default, the Retro Scaler A1 is configured for arcade games.  If you use it for something else, you need to make sure that RGB and SYNC is configured correctly.  You can change this by editing the [input] section of the ‘scalera1.ini’ file that will be created if you have an sd card inserted when powering up the scaler:

[input]
rgb=arcade
sync=TTL

One important distinction to make is that the Retro Scaler only accepts negative sync – which is the norm for pretty much everything relevant, except retro x86 PC’s where it’s a bit of a mix.

RGB input level

This one is easy, set to arcade for arcade boards and 75-ohm for everything else.

SystemSettingNote
Arcade PCB’sarcade0 – 4Vpp video level, 1000 Ohm impedance
Everything else75-ohm0 – 1Vpp video level, 75 Ohm impedance

Warning: feeding the scaler arcade level RGB signals while configured for 75-ohm will trigger constant brightness adjustments at best, and may at worst damage the scaler.

SYNC input level

This one is a little more tricky.  For ‘plain’ sync, set it to TTL, this is your basic digital sync that goes between 0 and 5V.  If you have no luck with TTL you can try the ‘scart’ setting – this will take most forms of sync that is not plain TTL.  If your system is ‘RGB modded’, there is a fair chance it outputs sync that works with the TTL setting, even if it’s designed to work with scart, so try TTL first.

SystemSetting
Arcade PCB’s and most other systemsTTL
SCART sync*scart

The TTL setting has additional jitter-reducing circuitry, but does not work with odd sync signals.  

Warning: feeding the scaler TTL level sync while configured for scart sync for a prolonged time may damage the scaler

A note for HAS users

If you’re using the excellent super-gun HAS, https://homearcadesystem.wordpress.com/, configure the A1 to use:

[input]
rgb=75-ohm
sync=TTL

The HAS always attenuate and re-amplify the RGB to 75-ohm, so you may experience a dark image if you use the A1’s default rgb=arcade setting.

On the HAS, verify that sync level is set to TTL with no processing if possible.   The capabilities in this respect varies a bit between the different HAS versions.  In order of preference, use either:

  • Unprocessed, or
  • Buffered

The “Regenerated” mode on the HAS will work in most cases, but can potentially cause issues with some games when used with the A1.

Making an input cable for the Retro Scaler A1

To make life a little easier, I highly recommend getting one of these off ebay, search for ‘vga male breakout shell’.

You don’t need to connect all the GND pins, but connect the ones you have in your cable.

The pinout of the caler is:

  1. Red
  2. Green
  3. Blue
  4. not connected
  5. GND
  6. GND
  7. GND
  8. GND
  9. not connected
  10. GND
  11. not connected
  12. not connected
  13. HSYNC and/or CSYNC
  14. VSYNC
  15. not connected

The shield of the input port of the scaler is by default not connected, as there is some debate if this is smart/safe or not.  There is a solder jumper on the bottom side of the PCB you can close if you know what you’re doing and feel this is necessary.

Introduction

Introduction

The Retro Scaler A1 will upscale the RGB video signals from your

  • Arcade Games
  • Retro Consoles
  • Retro computers

AFAIK, it’s the first and only purpose built Arcade scaler.

What it does

It line-doubles the input signal, effectively transforming a 15kHz signal found in Arcade Games and older systems into a 31kHz VGA signal.  It’s perfect for playing arcade games on a 31kHz VGA (or higher) CRT monitor like the European Sega Naomi Universal.  It’s also great if you want to build a ‘super-gun’, or user older consoles/computers with a a PC VGA CRT.  PC VGA monitors generally have a fantastic picture, but doesn’t do 15kHz – until now.

Lastly, while not specifically built for it, it’s a great alternative to get Jamma in your Vewlix cabinet.  Taito used to make a scaler similar to the Retro Scaler A1.  Subjectively, the Retro Scaler A1 has better image quality and is objectively easier to use – no need to dial in sync settings for different games.

Features 

  • Console/Computer AND Arcade/Jamma level RGB input
  • Scart type sync input
  • TTL/Jamma/Computer sync input
  • c-sync and h/v sync, only negative – most systems use negative sync.
  • 5 levels of scan-lines, from none to heavy.
  • Interlaced NTSC 480i and PAL 576i support
  • Automatic analog bypass of RGB – it does not touch the video signals from 31K sources
  • Dedicated sync stage to deal with tricky systems
  • Sync Analytics with automatic configuration, no user settings needed
  • Analog pre-adc gain stage with 512 steps to accommodate non-standard signal strength
  • 30 bit high quality ADC video input, 30 bit high quality DAC video output

Disclaimer/Warning

A lot of effort has gone into making the Retro Scaler A1 easy to use and compatible with older systems – with it’s sync analyzing features it is likely best-in-class.  However, it is impossible to test all systems ever made and some systems may have quirks or oddities that will not play nice with the Retro Scaler A1.  I will do my best to fix any issues, but sometimes the nature of the quirk will make a fix impossible. Please have a look at the list of tested sources.  If you have problems with a particular system and it’s not listed, please let me know!

Additional note on using with LCD monitors

LCD monitors are less forgiving when it comes to vertical refresh rates, which the Retro Scaler does not alter.  It can also be less predictable how certain monitor will deal with arcade resolutions with low vertical refresh and more vertical lines than ‘normal’, e.g. games like R-Type and Mortal Kombat.  The Retro Scaler will not crop lines, but your LCD may not display them.