
Introduction
This little write-up aims to take the magic out of this fantastic setup, make it accessible for everyone, and get you up to speed in a couple of hours instead of a couple of days.
The goal of this MAME setup is:
- Ease of setup and use, something that works as much of out the box as possible
- “Perfect” Image quality
- Optimal for 31 kHz monitors, like the monitor in my Naomi Universal cabinet 🙂
Hardware
I bought a refurbished Dell Optiplex 9010 SFF, Quad Core i5-3570 3.4GHz / Radeon 6450 1GB / 8GB RAM. It’s almost ideal, except that it’s too wide to fit through the base door of the cab. I chose this model for a couple of reasons:
- Has ‘built-in’ Windows 7 license, most name-brand PC’s do.
- Plenty fast enough
- Has a crt-emudriver compatible video card
- Quiet
To make it a little snapper to boot and work with, I installed a Crucial BX500 240GB 2,5″ SSD.
A JVS-PAC 2 goes without saying 🙂
Part 1 – Windows, GroovyMAME & CRT Emudriver
Step 1 – Install Windows
I found a torrent that had updated versions of Windows 7 ISO images, made a USB key and picked Win 7 Professional OEM x86. Update late 2023: Activation of windows 7 was only possible using the phone service. I also had to manually download two windows update patches to get the network driver package from Dell installed and to get Windows update running.
A few post-install steps:
- Press left shift until a popup about sticky keys appear – disable everything.
- Make sure device manager has drivers for the hardware you’re running (except video card)
- Control Panel\Hardware and Sound\Power Options\Edit Plan Settings – disable sleep and turning off display
- Install chrome
- Run windows update until it’s happy
Step 2 – Download GroovyMAME 0.220 & CRT Emudriver 2.0
GroovyMame and Emudriver runs in tandem.
Head over to GroovyMAME http://forum.arcadecontrols.com/index.php?board=52.0, GroovyMAME sticky topic.
The post is a little confusing and too long, follow the links to the Eiusdemmodi forun and grab the appropriate CRT Emudriver 2.0 package for your video card.
For GroovyMAME there is a google drive link in the same topic, you will need 7Zip to extract it.
Step 3 – Install CRT Emudriver
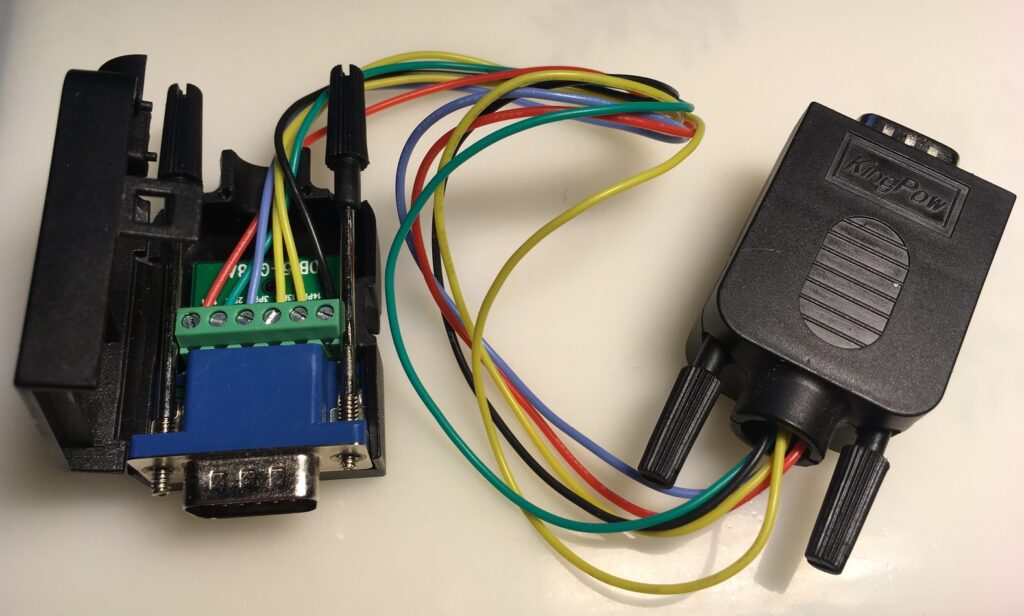
At this point, do yourself a big favor and use a cable that only has RGB, sync and ground. This will ensure that whatever you’re doing on your desk will be the same when you move machine to a cabinet. If you do this, you can also ignore everything that’s written about EDID emulation, monitor detection and whatnot. You can easily make one yourself with a couple of VGA breakout from eBay:
The Emudriver needs to tweak windows a bit, so first time you install it will ask you to enable “TESTSIGNING”, say yes, reboot, run install again. Your desktop should now say “Test Mode” in lower right corner.
Step 4 – install groovyMAME
Extract GroovyMame to c:\mame, create folder c:\roms and change rompath entry in mame.ini to:
rompath roms;c:\roms
Drop a few roms in the roms directory. At this point, MAME will not run properly.
Step 5 – Make groovyMame and EmuDriver do it’s thing
Run vmmaker that came with the driver.
“Edit settings”, set monitor type to “Arcade 31.5kHz – high resolution”. Click edit monitor presets, and change this entry (modified parameters highlighted) to:
monitor “arcade_31”, “Arcade 31.5 kHz – high resolution”, “4:3” crt_range0 31400-31500, 49.50-65.00, 0.940, 3.770, 1.890, 0.349, 0.064, 1.017, 0, 0, 384, 512, 0, 0
The changes accomplishes:
- Vertical resolutions >480 for games that have more than 240 lines
- Disable interlaced modes that will mess with MAME
Click the “MAME” tab, navigate to the mame64.exe you extracted in step 4.
Check Export Monitor settings to GroovyMame
Check “Get Video Modes from MAME.XML”.
Check “Generate XML from MAME executable”.
Verify that “Mode table method” is set to “Dynamic”.
OK it, back to main menu, click “Generate Modes” – this will query MAME and generate all needed video modes.
Finally, click “Install modes”
Step 6 – Verify mame
At this point, you should have a working system that will look fantastic.
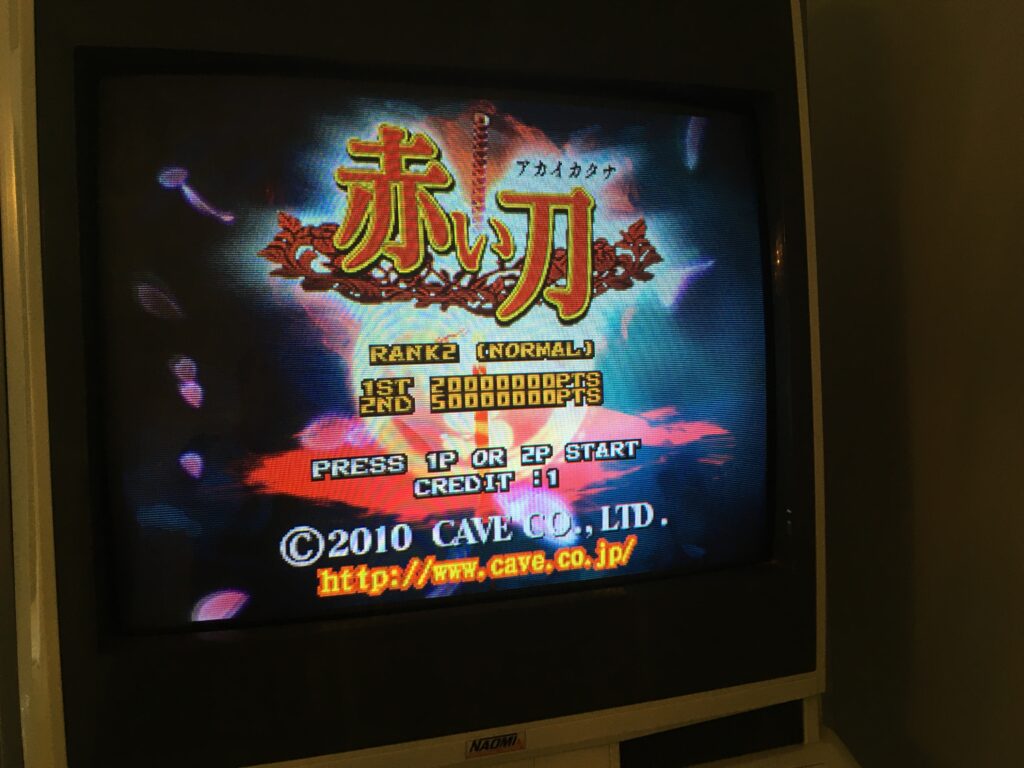
Mortal Kombat 3 is a good game to test with as it has odd resolution and refresh rate. When launching mk3, the info screen should say that switchres use “400 x 512p 54.707 Hz 31.402kHz”
Street Fighter 2 is another good game to test with, the info screen should say that switchres use “768 x 480 59.637 Hz 31.429 kHz”. Verify that the intro sequence does not tear.
If you want scanlines (you do), change the effects line in mame.ini to:
effect scanlines.png
I find the scanlines do not look quite right, so for crisper scanlines I use this , just right-clock and save it in your C:\mame\artwork folder.

Part 2 – Attract Mode frontend
http://attractmode.org/download.html
Extract to c:\attract
Launch attract, it should ask if detected emulators should be imported – say yes. It will now launch, and display the test roms you have in your c:\roms folder, but will not launch them properly.
[TAB] to configure , navigate to “Emulators” -> “mame”, change “Working Directory” to “c:\mame”, ESC back to game list, you should be able to launch the games.
Add more roms
After dropping some more roms into the c:\roms directory,
[TAB] to configure, navigate to “Emulators” -> “mame”, scroll down to “Generate Collection/Rom List”, “Overwrite existing ‘mame’ list?” -> yes,
Disable intro video
[TAB] to configure screen, “Intro”, change “Play Intro” to No.
Part 3 – Prepare PC for cabinet
This would be a good time to connect the JVS-PAC 2, you will see that windows installs drivers the first time you connect it. Don’t worry about JVS at this point.
We want windows to run in 640×480 60Hz, and we want Attract Mode to launch automatically on boot.
Run windows in 640×480 60Hz
Right click on desktop, Screen Resolution, “Advanced settings”, “List All Modes”, pick “640 by 480, True Color (32 bit), 60 Hertz”, “OK”, “OK”.
Since you earlier decided to make your life easy with a special VGA cable, this will “stick” when you move the computer to a cabinet.
Launch Attract Mode at startup
Create a batch file c:\attract\start-attract.bat (you can use notepad):
timeout 7
c:\attract\attract.exe
I experienced windows stealing focus from Attract Mode, resulting in keyboard input not working – the timeout 7 takes care of that.
Make it launch at startup:
Windows start -> All Programs -> Right click “Startup” -> “Explore”
Right click, “New” -> “Shortcut”, navigate to the batch file you just created.,
reboot machine to verify.
Last Updated on 2023-09-20 by admin