
MiSTer installation
This page describes what you must do before installing the JAMMA Expander. I recommend doing this on a desk with a normal HDMI monitor, network cable and keyboard connected.
Required Hardware
- DE10-Nano kit
- Micro SD card – I use a normal 16GB card and have plenty of space left
- 128MB SDRAM module
- Computer with micro SD card reader
- USB OTG adapter for connecting a keyboard (one is provided with the Expander)
- USB keyboard
- HDMI cable and monitor
Step 1 – Preparing the SD card
First you need to install “Mr. Fusion – Universal MiSTer installation image” on an SD card, https://github.com/MiSTer-devel/mr-fusion. You do this from a normal computer, instructions in the link.
Step 2 – Power up and update MiSTer
For the initial setup, it’s probably best to do it on a desk with a keyboard, an ethernet cable and a normal HDMI monitor.
Boot up MiSTer, press F12, navigate to “Scripts”, and choose “update”, let it do it’s thing. You will at this point have a lot of games and consoles you can launch, but they won’t run correctly as you don’t have the required ROM files – proceed to step 3..
Step 3 – Making MiSTer useful
How MiSTer organizes cores, roms, launching files etc is a bit of a moving target and can be confusing and frustrating to set up from scratch. Luckily, there is a script that does everything for you:
https://github.com/theypsilon/Update_All_MiSTer
Run this script, and it should take care of making your MiSTer useful.
Step 4 – Verify that your MiSTer is working
At this point, you should have a working MiSTer and be able to launch games.
- DO NOT proceed until you have a working MiSTer installation
- DO NOT remap/configure inputs – this will be done in a later step.
Step 5 – Making your MiSTer cab ready
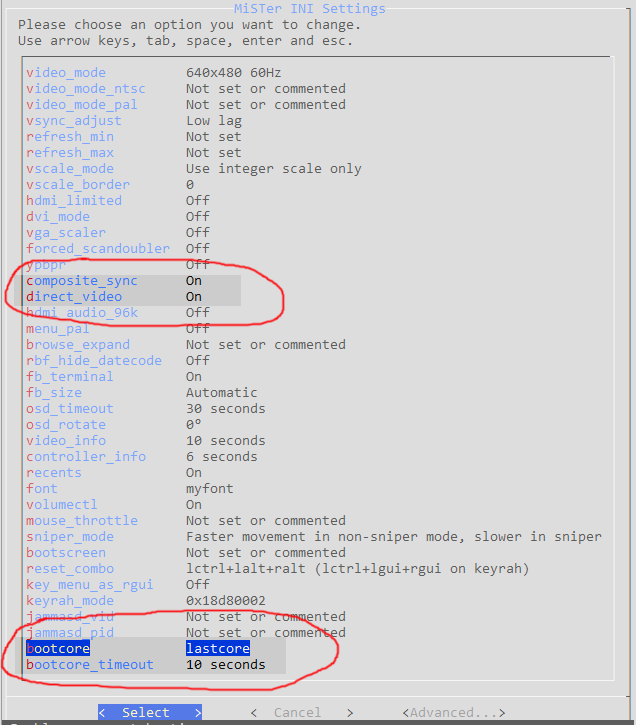
Launch the script ini_settings.sh, you can do this by pressing F12 and pressing left once MiSTer has started. There are 4 settings you should change:
- composite_sync=on – JAMMA uses composite sync
- direct_video=on – Cores will output native resolution and colors via the HDMI port
- bootcore=lastcore – The last game played will be launched automatically next time you power up
- bootcore_timeout
Last Updated on 2022-11-19 by admin